Working with perspectives
What is a perspective?
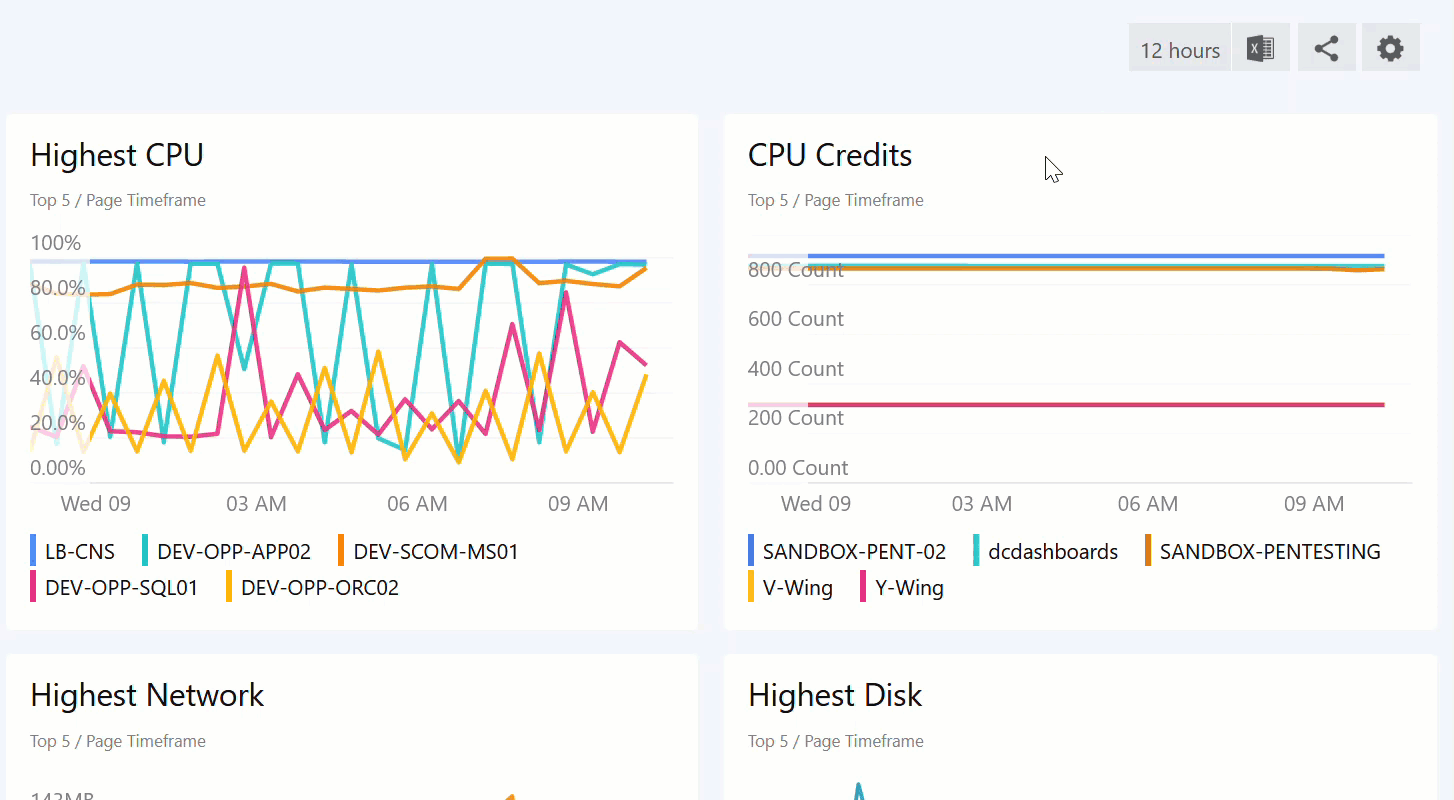
A perspective looks like a dashboard, but while a dashboard gives you an overview about all your
Each perspective contains data about a specific aspect of the
Perspectives use the same tiles as a dashboard, but they show data in the context of the specific
The power of perspectives is that tiles on a perspective can use a dynamic scope. A dynamic scope considers the currently viewed
the configuration of the scope in the tile (for example, "consider child objects of type logical disk for the currently viewed object")
the actual resolved scope that depends on which
object you are currently viewing ("this object has 5 child objects of type logical disk")
After configuring the dynamic scope once in the tile, you'll get different results depending how the scope is resolved on the different
The overall health state of the
object is shown directly in the titleYou can put the object into maintenance mode with the click of a single button.
You can run tasks against the object directly without having to create an action button or a Task tile first.
You can easily switch between perspectives for the same
object to get all the information they need.
an application (DAs, EAs, etc.)
a group
a single object like a server
an alert
a monitor
a rule
The basic concept of perspectives applies to all SCOM objects. Perspectives for the SCOM objects alerts, monitors, and rules have slightly different target settings (see Settings for perspectives) and buttons (see Buttons on perspectives).
Where do I find perspectives?
Perspectives are only visible on the drilldown of
Perspective ribbon:

Tip: You can also add perspectives to the navigation bar to create a shortcut to a specific perspective (see Pinned Perspectives).
Webinars
A 'pinned perspective' is a perspective that has been added to the navigation bar (available in v4.5 and above).
Pinning a perspective to the navigation bar creates a handy shortcut to a perspective for a specific
Note: A pinned perspective is one perspective for one specific
For more use cases of pinned perspectives and how to create them see Pinned Perspectives.
What are suppressed perspectives?
A suppressed perspective is hidden from the perspective ribbon by default. The perspective is still available for the
Suppressing a perspective does not change the target, which means the

Info: On a fresh install of Dashboard Server v4.2 and above the performance and monitored entity perspectives are suppressed by default for Enterprise Applications. If Dashboard Server has been upgraded from an earlier version no perspectives will be pre-configured as suppressed.
How to create or edit a perspective
Note: Only Dashboard Server Admins can create and edit perspectives. This applies also to pinned perspectives in Team Folders. While a normal dashboard in a Team Folder can be edited by users when they have the author or owner role for the Team Folder, a pinned perspective in a Team Folder can't be edited by users, even if they have the author or owner role, since editing a perspective affects all
If you want to create a new perspective:
You first need to decide which
objects the perspective will apply to:If you want to create a perspective that only applies to one specific
object you need to navigate to that specificobject .If you want to create a perspective that applies to all objects no matter their type, you can navigate to any object.
If you want to create a perspective that applies to all objects of a specific group or class, you need to navigate to an object of that group or class. Otherwise, the group or class won't be shown in the target dropdown for selecting a group or class.
After you navigated to the correct
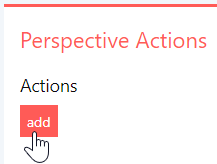
object you need to click on the + button on the perspective ribbon.
If you want to edit a perspective:
Go to one of the
objects that contain the perspective, choose the perspective from the perspective ribbon and click on the edit button.
Creating or editing perspectives consists of three parts:
Defining the settings for the perspective
Configuring the tiles on the perspective
Publishing the perspective to make it available
Defining the settings for the perspective
Tip: If the settings section is hidden, click on the settings button at the top right of the page to make the section visible again.

 Settings for perspectives
Title
The title of the perspective is the name that will be shown in the perspective ribbon.
Choose a title that is appropriate for this perspective. A perspective often applies to different
objects so the title should not be specific to oneobject in that case.Target
The target of a perspectives determines two things:
for which set of
objects the perspective will be visible in the perspective ribbonwhich set of
objects will be used for the dynamic scope of the tilesNote about the relation between the perspective's target and the scope of the perspective's tiles:
Usually, when you create tiles on a perspective you use a dynamic scope for them that adapts to the currently viewedobject . When you define a perspective's target, you define for whichobjects the perspective will be available. Since the target determines theobjects that can be viewed and the currently viewedobject determines how the dynamic scope is resolved, the target directly affects the scope of those tiles.
When you are creating a new perspective, the default target will always be the class of the object you were viewing when you clicked on the "add a new perspective" button. You can change the target if needed, but you can only choose groups and classes the object you were viewing belongs to.
Target settings for normal SCOM objectsthis
object onlyThe perspective will only be visible for the one specific
object you picked, for example one specificserver . This means the perspective won't be visible for any otherobjects .Choose this option if you want to create a very specific perspective that is only relevant to one specific
object .all objects The perspective will be visible for all
objects , no matter theirclass .Choose this option if you want to create a very broad perspective that is relevant for every
object .members of The perspective will be visible for any object that belongs to the group, class, or health state you chose. For example, if you choose the class Windows Server the perspective will be visible for all objects that belong to the Windows Server class.
Note: You can only choose groups and classes that the object you are currently viewing is a member of.
Choose a group if you want to create a perspective that is relevant to a specific group, for example an application or a team.
Choose a class if you want to create a perspective that is relevant for all objects of this class.
Choose a health state if you want to create a perspective for objects with a specific health state, for example alerts or monitors.Target settings for alertsthis alert only
The perspective will only be visible for the type of alert you're currently looking at, based on its alert ID. This means the perspective won't be visible for any other alerts with a different ID, even if they have the same name.
Example: Let's say you are looking at a "High CPU" alert. If you are using different Management Packs for different Windows versions, they will all include the same alert with the same name "High CPU", but they will have different IDs. If you are currently looking at a "High CPU" alert on Windows 2008, and you choose "this alert only", the perspective will only be visible for "High CPU" alerts on Windows 2008.
all alerts The perspective will be visible for all alerts, no matter their name or ID.
Choose this option if you want to create a very broad perspective that is relevant for every alert.
members of The perspective will be visible for all alerts that share the exact same name but have different IDs because they come from different Management Packs.
Example: Let's say you are looking at a "High CPU" alert. If you are using different Management Packs for different Windows versions, they will all include the same alert with the same name "High CPU", but they will have different IDs. If you choose "members of: High CPU", the perspective will be visible for all alerts called "High CPU", no matter from which Management Pack (Windows 2008, 2012, 1016, etc.) they come from.
Suppress this perspective
Here you can choose the criteria for when the perspective should be suppressed.
What is a suppressed perspective?A suppressed perspective is hidden from the perspective ribbon by default. The perspective is still available for the
object but users have to click on the arrow button in the perspective ribbon to see it. Suppressing perspectives are helpful to keep the perspective ribbon nice and tidy.Suppressing a perspective does not change the target, which means the
object still has to match the target for the perspective to be available in the ribbon bar. If it does, the criteria for the suppressed perspective determine if the perspective is visible directly or hidden behind the arrow button.Info: On a fresh install of Dashboard Server v4.2 and above the performance and monitored entity perspectives are suppressed by default for Enterprise Applications. If Dashboard Server has been upgraded from an earlier version no perspectives will be pre-configured as suppressed.
Settings for suppressing perspectivesthis object only Suppresses the perspective only for the one object you are currently looking at. all objects of type Suppresses the perspective for the class you chose here. Only classes the object you are currently looking at belongs to are available. all objects in the same group Suppresses the perspective for the group you chose here. Only groups the object you are currently looking at belongs to are available. Graph colors
Graph color matching means that one item (a specific resource, object, site, anything you are displaying in your graphs) is shown in the same color in different graphs on one dashboard
or one perspective .The default setting is on.
For more details about graph color matching see How to enable graph color matching.
Configuring the tiles on the perspective
The main difference between configuring tiles on dashboards and on a perspective is the scope option.
Scope options for tiles on perspectivesThe power of perspectives is that tiles on a perspective can use a dynamic scope. A dynamic scope considers the currently viewed
object . A dynamic scope consists of two different states:the configuration of the scope in the tile (for example, "consider child objects of type logical disk for the currently viewed object")
the actual resolved scope that depends on which
object you are currently viewing ("this object has 5 child objects of type logical disk")
After configuring the dynamic scope once in the tile, you'll get different results depending how the scope is resolved on the different
objects you are viewing.General advice for scoping tiles on perspectives
Remember that a scope for tiles on perspectives usually has to be fitting for multiple different objects. You always have to consider:
For which objects will this perspective be visible? (determined by the target of the perspective)
Is the scope I am configuring for a tile appropriate for all objects the perspective will be visible on?
Example:
You create a perspective with the target "class: Windows Server". The perspective will therefore be visible for all objects of the class Windows Server.Now you create a tile on the perspective and scope it to "this object's children of class: Windows Server 2016 Logical Disk". This means that when you view a 2016 Windows server, you'll see data about the server's logical disks in the tile. But when you view a 2012 Windows Server the tile will show no data because the tile's scope is limited to logical disks on 2016 servers. Instead of picking "Windows Server 2016 Logical Disk" you should pick "Windows Server Logical Disk" to make the tile adjust to any object that uses the perspective.
There are two different sets of options when scoping tiles on perspectives. It depends on the tile you want to scope which set of options you'll see.
Scope options for all tiles except Alert and SCOM task tilesSuggestions
Suggestions are generated based on the object you are currently viewing. You'll see a list of relevant scope options based on the object's relations to other objects. Suggestions don't cover every possible scope, but they are a quick and easy way to select a suitable scope for your tile.
Note: Suggestions won't be shown if an object has no children, parents or siblings.
Tip: If the exact scope you want isn't listed in the suggestions, you can select a suggested scope that is similar to the one you want, and then click on custom. The custom section will now automatically be filled with the suggestion you picked and you can edit the scope here to adjust it exactly to your needs. This is a more intuitive way to pick a scope than starting in the custom section and navigating the SCOM object model for classes and groups.
Double-check the scope when using suggestions: Using suggestions is an easy way to pick a scope, but you need to make sure that the generated suggestion is appropriate for all objects that use the perspective.
For example, when you pick a suggestion for an EA, you will get suggestions that are specific to the map, dependencies, and availability tests for this one EA. On perspectives you want to use for all EAs, you have to change the scope suggestion in the custom section so that the tile work for all EAs.Walkthrough: Editing a scope suggestion to make it work for all EAsEnterprise Applications are designed so that you can map out the servers that make up the application. You can then configure tiles to show information related to just the servers on the EA's map. When you create a perspective that will be used for all EAs, you need to make sure that you scope the tiles so that they work for any EA. When you start with a suggestion, the tile's scope only works for the one EA you're currently looking at, and this is why you need to edit the scope:
For an EA you want to scope to the servers that are specified on the EA map by selecting something from the suggestions (Dashboard Server 4.2 and above) that shows something similar to the following:
This /<YourApplicationName> Map / ... / Windows ComputerThe above will scope the tile to all the objects of class Windows Computer on this EAs map.
The screenshot below shows some scope suggestions for an application called FinanceXS. The bold text shows the currently selected scope is This object. The cursor shows the option
This / FinanceXS / ... / Windows Computer. Once chosen this scope will show all the Windows computers shown on the applications map.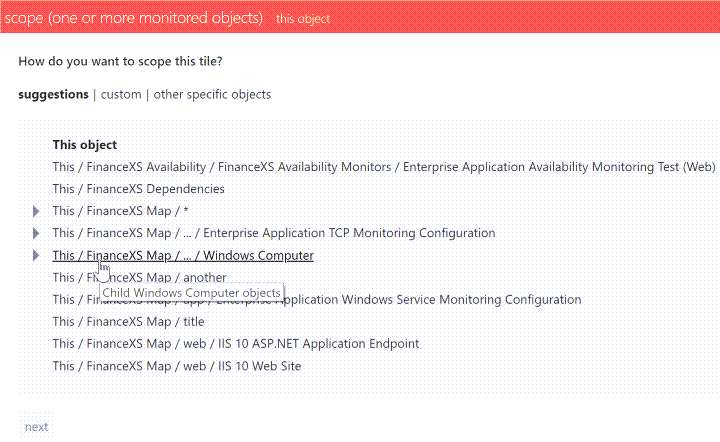
Next, we need to adjust the specified scope to allow it to work for all EAs, rather than just this one.
- In the scope section click custom.
Click on the text
<YourApplicationName> Map (children)which is your first scope step. This will expand the scope step so you can edit it.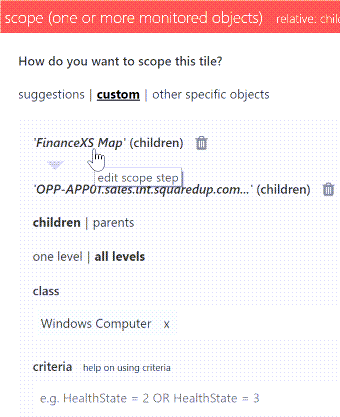
Remove the auto-populated class
<YourApplicationName> Mapby clicking the cross x next to it.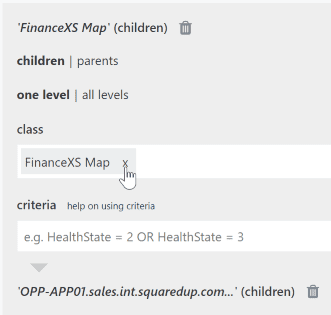
Start typing
Enterprise Application - Mapand select this from the list to add this class. This is so that this tile scope will work for all EAs, rather than just this one EA.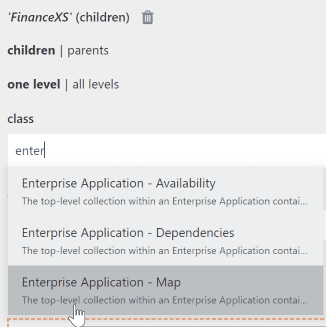
- The scope is now configured to show all the Windows computers on the EA's map, whichever EA you happen to be viewing with the perspective.
How to read the suggestionsYou can pick between "this object" and objects that are related to this object as parents, children or siblings. The suggestions for children are written as paths that follow the SCOM object tree structure, parents and siblings can be identified by the word parent or sibling in the suggestion.
A parent of an object is any object that hosts or contains that object.
A child of an object is any object that this object hosts or contains.
A sibling of an object is any object of the same class that is hosted by the same parent.This object The dynamic scope will be resolved to the object currently viewed.
"this object" option which does NOT mean the actual one object like for the target setting but the relative object I'm looking at
This / child/child/class of objectThe dynamic scope will be resolved to children of the object currently viewed.
You select objects of a particular class that are contained in path. The class of the objects you are selecting is stated at the end of the path.
This / * The dynamic scope will be resolved to children of the object currently viewed.
If a path ends with a wildcard (*) it means that you select all objects of any class within the path.
Technically it means that we fill the class field with the class "logical entity" since every object in SCOM has this class, it is a "base" class
Example:
This / IIS Web Server / *selects all objects of any class in the level belowThis / IIS Web Server.This / child/ ... /class of objectThe dynamic scope will be resolved to children of the object currently viewed.
If a path contains an ellipsis (...) it means that you select objects of a particular class that are contained in all of the objects that are contained in the path preceding the ellipsis. The class of the objects you are selecting is stated at the end of the path.
Example:
This / Sales App Map / ... / Windows Computerselects all objects of the class Windows Computer in theThis / Sales App Mappath.Parent class of objectThe dynamic scope will be resolved to parents of the object currently viewed. Sibling class of objectThe dynamic scope will be resolved to siblings of the object currently viewed. Show more triangle next to a suggestion
You can click the show more triangle to expand the list of suggestions and see more specific paths.Example for navigating suggestions in an EAIf you are looking at an EA, the path to find all windows computers in that EA may read
Map / ... / Windows Computer. It returns all objects of the Windows Computer class contained within all of the paths underMap.To narrow the scope down, you can click on the triangle to expand the suggestion and select one of the more specific paths. If you select
Map / Web / Windows Computeryou will find all objects of the Windows Computer class in the pathMap / Web.If you choose the option
Map / *you'll find all objects contained in the map. If you extend this suggestion by clicking on the triangle, you'll see suggestions to select all objects in a more specific path, for exampleMap / Web / *.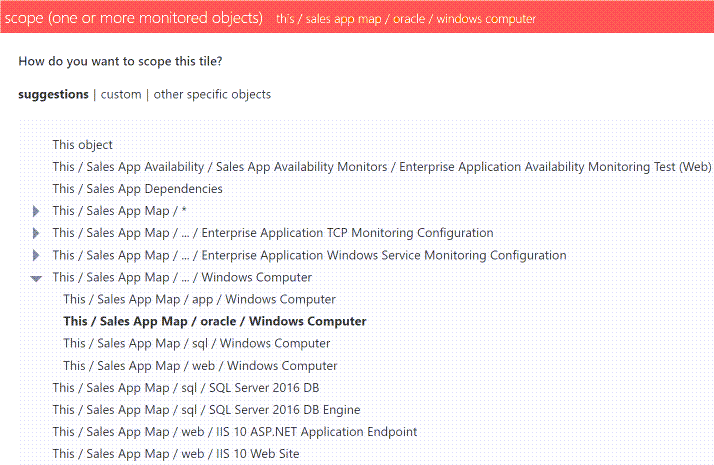
Custom
Here you can pick objects that are related to the object you are currently looking at. If you want to create a specific scope that is not listed under suggestions, you can create the scope here.
Tip: You can pick a similar scope under suggestions first and then click on custom to edit it.
How to pick a simple relation (one step through the SCOM model)At the top, you'll see the name of the object you are currently looking at. Now you can choose if you want to pick parents or children of that object, and if this parent or child relation should be considered only one level up or down the SCOM model or through all levels.
Class:
Here you pick the class of the objects you want to select. If you leave this field empty, the scope falls back to the "this object" scope.
Note: You will only see groups and classes that the object you are currently looking at is a member of.
Tip: If you want to pick objects of any class, enter the SCOM base class logical entity in the class field.
Tip: If you want to find out what classes the object you are interested in belongs to, you can go to the Monitored Entity perspective of that object. You'll see all the classes the object belongs to listed there.
Criteria:
You can narrow the selection of objects of a particular class down further by entering criteria for those objects. For more help see How to use criteria when scoping objects.
Tip: If you want to find out what properties you can base your criteria on, you can go to the Monitored Entity perspective of the object you are interested in. You'll see all the properties for criteria listed there.
.
Example for picking a simple relationFor example, for a perspective created for the group IIS8 Computer Group adding a Status tile scoped to show children with a class of
objectwill show the group members, i.e. the members of the IIS8 Computer Group.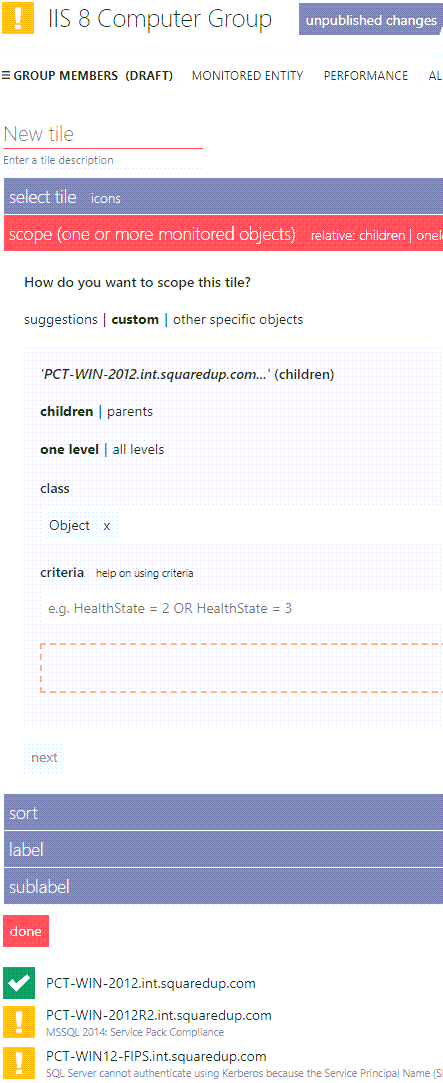 How to pick advanced relations (multiple steps through the SCOM model)
If you need to traverse a more advanced SCOM object model like an EA, you can use the + button to add more steps. This creates a scope that can go through any kind of path of the SCOM object model.
Complete the following steps and then click the + button after you're done to add the next level of SCOM objects:
At the top, you'll see the name of the object you are currently looking at. Now you can choose if you want to pick parents or children of that object, and if this parent or child relation should be considered only one level up or down the SCOM model or through all levels.
Class:
Here you pick the class of the objects you want to select. If you leave this field empty, the scope falls back to the "this object" scope.
Note: You will only see groups and classes that the object you are currently looking at is a member of.
Tip: If you want to pick objects of any class, enter the SCOM base class logical entity in the class field.
Tip: If you want to find out what classes the object you are interested in belongs to, you can go to the Monitored Entity perspective of that object. You'll see all the classes the object belongs to listed there.
Criteria:
You can narrow the selection of objects of a particular class down further by entering criteria for those objects. For more help see How to use criteria when scoping objects.
Tip: If you want to find out what properties you can base your criteria on, you can go to the Monitored Entity perspective of the object you are interested in. You'll see all the properties for criteria listed there.
.
Other specific objects
Gives you the normal, non-dynamic scope options you are used to when scoping tiles on dashboards. This means the tile will not dynamically adapt it's content to the currently viewed
object , it will always show data for the staticobject picked here.Since the power of perspectives is that their tiles can show data for different
objects depending on whatobject is currently being viewed, you should only select this option when you are sure that there is no relationship between the desired scope and the currently viewedobject .Scope options for Alerts and SCOM task tilesThe Alerts and the SCOM task tile have slightly different options than other tiles because they require different settings.
This object
The dynamic scope will be the resolved to the object that is currently viewed.
Relative objects
The dynamic scope will be resolved to relative objects (parents or children) of the object that is currently viewed.
How to pick relative objectsAt the top, you'll see the name of the object you are currently looking at. Now you can choose if you want to pick parents or children of that object, and if this parent or child relation should be considered only one level up or down the SCOM model or through all levels.
Class:
Here you pick the class of the objects you want to select. If you leave this field empty, the scope falls back to the "this object" scope.
Note: You will only see groups and classes that the object you are currently looking at is a member of.
Tip: If you want to pick objects of any class, enter the SCOM base class logical entity in the class field.
Tip: If you want to find out what classes the object you are interested in belongs to, you can go to the Monitored Entity perspective of that object. You'll see all the classes the object belongs to listed there.
Criteria:
You can narrow the selection of objects of a particular class down further by entering criteria for those objects. For more help see How to use criteria when scoping objects.
Tip: If you want to find out what properties you can base your criteria on, you can go to the Monitored Entity perspective of the object you are interested in. You'll see all the properties for criteria listed there.
.
Note for SCOM task tiles:
You have to pick one single object for SCOM task tiles since the task has to be run for one specific object. If you pick the scope option relative objects, you need to narrow the scope down to one object with the help of a class and criteria.
Other specific objects
Gives you the normal, non-dynamic scope options you are used to when scoping tiles on dashboards. This means the tile will not dynamically adapt it's content to the currently viewed
object , it will always show data for the staticobject picked here.Since the power of perspectives is that their tiles can show data for different
objects depending on whatobject is currently being viewed, you should only select this option when you are sure that there is no relationship between the desired scope and the currently viewedobject .There are detailed articles for each of the different tiles, that take you through all the configuration options and a walkthrough to get you started.
For more information about how to configure each tile type see the list of tile articles here:
Publishing the perspective
The new or edited perspective will be saved as a draft. You can identify a draft by two indicators:
There's (DRAFT) written behind the perspective's names in the perspective ribbon
There's an unpublished changes button next to the
object's name
To publish the new or changed perspective click the unpublished changes button at the top of the screen, then click publish to make the changes live.
How to delete a perspective
The easiest way to delete a dashboard![]() button and then click the delete button.
button and then click the delete button.
Note: If you are deleting a pinned perspective, you only delete the pinned perspective, not the original perspective.

Note about the discard button:
If a dashboard
If the dashboard
If you unpublish a dashboard
More options to delete a dashboard
Note: These options only work for dashboards and pinned perspectives, not for perspectives. If you delete a pinned perspective, only the pinned perspective will be deleted, not the original perspective.
Other options to delete a dashboard
You can delete the dashboard
or pinned perspective from the navigation bar. Deleting it from the navigation bar will delete it completely, not just from the navigation bar.Information about editing the navigation barThe global navigation editor is accessible only by
SCOM administrators (Types of users in Dashboard Server) from the right-hand menu ☰ > edit navigation or system > dashboards.This allows
SCOM administrators to reposition globally viewable folders and Team Folders on the navigation bar, as well as the ability to move any globally viewable dashboards.
Globally viewable (normal) dashboards are shown simply by the dashboard name.
Globally viewable folders (normal folders that appear on the navigation bars for everyone) are shown by a folder icon:

Team folders are shown with this icon:

Managing the dashboards within Team Folders is done from the Team Folder settings page.
Click on the dashboard 'handle' to drag it to a new position, for example, drag it to the right to move it into a subfolder.
Reordering content is saved automatically and any changes are instantly reflected.
There are 3 icons across different elements of the navigation editor when hovering on a folder:

The edit team folder icon is shown next to Team Folders and clicking it will take you to the Team Folder settings page where you can view and sort the dashboards within the Team Folder. 
The view folder button takes you to the folder itself to view or edit that folder. 
The delete button will delete items. This deletes the dashboard or folder and sub-contents completely, not just from the navigation bar. If the dashboard
or pinned perspective is in a folder, you can go to the folder settings , click the edit
 button, and delete it from the folder. Deleting it from the folder will delete it completely, not just from the folder.
Walkthrough: Creating a perspective and adding tiles
This walkthrough will guide you through creating a new perspective using a specific example.
We are going to create a new perspective for an existing Enterprise Application (EA) (see Enterprise Applications) and use the Matrix tile to show data.
In this walkthrough we are going to create a perspective to show the servers on the map for an Enterprise Application (EA).
- In Dashboard Server browse to the object you wish to create a perspective for. For example, for an Enterprise Application, browse to Applications > Enterprise Applications and click on one of the EAs at the bottom of the page. As the menu structure is completely customisable this may be different in your environment, so you may prefer to use the search at the top right.
On the perspective ribbon click the plus button to add a new perspective.

The plus button on the navigation bar allows you to create a dashboard or a folder. To create a perspective you want the plus button on the perspective ribbon.
- When you create a new perspective the perspective settings are opened straight away. Give your new perspective a title.
Set the target for the new perspective. If you select this object only then this new perspective will only be shown for the object you are viewing now. If you select all objects then every SCOM object you view in Dashboard Server will show this perspective. If you choose members of you can enter a group or class and all objects of that group class will show this perspective. To make this perspective show for all EAs, add the class
Enterprise Application (v1)by clicking in the class box and starting to typeEnterprise Application (v1)then selecting it from the list.
If the class is autopopulated with that of the particular EA you are viewing, remove this by clicking on the x, and then add
Enterprise Application (v1).The perspective target will only show you the groups and classes that the object you have drilled down to is a member of.
The Suppress this perspective (hide by default) option can be used to hide a perspective from a subset of objects. We won't use this for this walkthrough.
this perspective.
Close the perspective settings by clicking the cross at the top of the section.
The new tile section is open by default. Click the Matrix tile icon.

7. For an EA you want to scope to the servers that are specified on the EA map by selecting something from the suggestions (Dashboard Server 4.2 and above) that shows something similar to the following:
This /<YourApplicationName> Map / ... / Windows Computer
The screenshot below shows the scope for the tile set to show all the objects of class Windows Computer on this particular EA's map:

The suggestions allow you to quickly find a relevant scope for your tile, which is more intuitive than navigating the SCOM object model for classes and groups.
Next we need to adjust the specified scope to allow it to work for all EAs, rather than just this one.
8. In the scope section click custom. The custom option shows details of the selected suggestion in custom mode to allow you to edit it further, making it easy to create a scope that wasn't suggested but is similar to one that was.
9. Click on the text <YourApplicationName> Map (children) which is your first scope step. This will expand the scope step so you can edit it.
10. Remove the auto-populated class <YourApplicationName> Map by clicking the cross x next to it.
11. Start typing Enterprise Application - Map and select this from the list to add this class. This is so that this tile scope will work for all EAs, rather than just this one EA.
12. The scope is now configured to show all the Windows computers on the EA's map, whichever EA you happen to be viewing with the perspective.
13. Click done.

14. To make this new perspective available to other users you would click the publish button at the top of the screen.
For more information about creating your own dashboards to show Enterprise Applications take a look at the v4 training video (24 mins) 'Building Enterprise Application Dashboards':
Settings for perspectives
Title
The title of the perspective is the name that will be shown in the perspective ribbon.
Choose a title that is appropriate for this perspective. A perspective often applies to different
Target
The target of a perspectives determines two things:
for which set of
objects the perspective will be visible in the perspective ribbonwhich set of
objects will be used for the dynamic scope of the tilesNote about the relation between the perspective's target and the scope of the perspective's tiles:
Usually, when you create tiles on a perspective you use a dynamic scope for them that adapts to the currently viewedobject . When you define a perspective's target, you define for whichobjects the perspective will be available. Since the target determines theobjects that can be viewed and the currently viewedobject determines how the dynamic scope is resolved, the target directly affects the scope of those tiles.
When you are creating a new perspective, the default target will always be the class of the object you were viewing when you clicked on the "add a new perspective" button. You can change the target if needed, but you can only choose groups and classes the object you were viewing belongs to.
this | The perspective will only be visible for the one specific Choose this option if you want to create a very specific perspective that is only relevant to one specific |
| all | The perspective will be visible for all Choose this option if you want to create a very broad perspective that is relevant for every |
| members of | The perspective will be visible for any object that belongs to the group, class, or health state you chose. For example, if you choose the class Windows Server the perspective will be visible for all objects that belong to the Windows Server class. Note: You can only choose groups and classes that the object you are currently viewing is a member of. Choose a group if you want to create a perspective that is relevant to a specific group, for example an application or a team. |
this alert only | The perspective will only be visible for the type of alert you're currently looking at, based on its alert ID. This means the perspective won't be visible for any other alerts with a different ID, even if they have the same name. Example: Let's say you are looking at a "High CPU" alert. If you are using different Management Packs for different Windows versions, they will all include the same alert with the same name "High CPU", but they will have different IDs. If you are currently looking at a "High CPU" alert on Windows 2008, and you choose "this alert only", the perspective will only be visible for "High CPU" alerts on Windows 2008. |
| all alerts | The perspective will be visible for all alerts, no matter their name or ID. Choose this option if you want to create a very broad perspective that is relevant for every alert. |
| members of | The perspective will be visible for all alerts that share the exact same name but have different IDs because they come from different Management Packs. Example: Let's say you are looking at a "High CPU" alert. If you are using different Management Packs for different Windows versions, they will all include the same alert with the same name "High CPU", but they will have different IDs. If you choose "members of: High CPU", the perspective will be visible for all alerts called "High CPU", no matter from which Management Pack (Windows 2008, 2012, 1016, etc.) they come from. |
Suppress this perspective
Here you can choose the criteria for when the perspective should be suppressed.
A suppressed perspective is hidden from the perspective ribbon by default. The perspective is still available for the
Suppressing a perspective does not change the target, which means the
Info: On a fresh install of Dashboard Server v4.2 and above the performance and monitored entity perspectives are suppressed by default for Enterprise Applications. If Dashboard Server has been upgraded from an earlier version no perspectives will be pre-configured as suppressed.
| this object only | Suppresses the perspective only for the one object you are currently looking at. |
| all objects of type | Suppresses the perspective for the class you chose here. Only classes the object you are currently looking at belongs to are available. |
| all objects in the same group | Suppresses the perspective for the group you chose here. Only groups the object you are currently looking at belongs to are available. |
Graph colors
Graph color matching means that one item (a specific resource, object, site, anything you are displaying in your graphs) is shown in the same color in different graphs on one dashboard
The default setting is on.
For more details about graph color matching see How to enable graph color matching.
Buttons on perspectives

What kinds of buttons are available on perspectives depends on what kind of object you are viewing.
Buttons on perspectives for SCOM objects
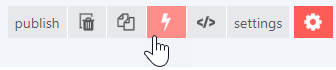
| Maintenance mode | Allows you to put an object into maintenance mode, see How to put an object in maintenance mode on a perspective Note: If you can't see this button, you're probably looking at a perspective for an alert, monitor, or a rule. The button is not available for those SCOM objects. | ||||
| Task | Allows you to run a SCOM task, see How to run tasks on perspectives Note: If you can't see this button, you're probably looking at a perspective for an alert, monitor, or a rule. The button is not available for those SCOM objects. | ||||
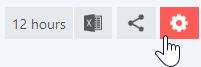
| Page timeframe (12 hours by default) | Allows you to change the page timeframe. The page timeframe is the timeframe setting a dashboard
| ||||
 (Export to Excel) (Export to Excel) | Allows you to export the perspective to Excel, see Export to Excel Note: If you can't see this button, you're probably looking at a perspective for an alert, monitor, or a rule. The button is not available for those SCOM objects. | ||||
 (Share) (Share) | Allows you to share the perspective. Sharing options
| ||||
 (Settings) (Settings) | Allows you to switch to edit mode. |
Additional buttons on perspectives for alerts and monitors
| Ticket (only for alerts) | Allows you to change the ticket ID. |
| Owner (only for alerts) | Allows you to change the owner of the ticket. |
| Resolution state (only for alerts) | Allows you to change the resolution state of the alert. |
| Reset monitor (for alerts) Reset (for monitors) | Allows you to set the monitor (for this alert) to a healthy state. |
Scoping tiles on perspectives
The power of perspectives is that tiles on a perspective can use a dynamic scope. A dynamic scope considers the currently viewed
the configuration of the scope in the tile (for example, "consider child objects of type logical disk for the currently viewed object")
the actual resolved scope that depends on which
object you are currently viewing ("this object has 5 child objects of type logical disk")
After configuring the dynamic scope once in the tile, you'll get different results depending how the scope is resolved on the different
General advice for scoping tiles on perspectives
Remember that a scope for tiles on perspectives usually has to be fitting for multiple different objects. You always have to consider:
For which objects will this perspective be visible? (determined by the target of the perspective)
Is the scope I am configuring for a tile appropriate for all objects the perspective will be visible on?
Example:
You create a perspective with the target "class: Windows Server". The perspective will therefore be visible for all objects of the class Windows Server.
Now you create a tile on the perspective and scope it to "this object's children of class: Windows Server 2016 Logical Disk". This means that when you view a 2016 Windows server, you'll see data about the server's logical disks in the tile. But when you view a 2012 Windows Server the tile will show no data because the tile's scope is limited to logical disks on 2016 servers. Instead of picking "Windows Server 2016 Logical Disk" you should pick "Windows Server Logical Disk" to make the tile adjust to any object that uses the perspective.
There are two different sets of options when scoping tiles on perspectives. It depends on the tile you want to scope which set of options you'll see.
Suggestions
Suggestions are generated based on the object you are currently viewing. You'll see a list of relevant scope options based on the object's relations to other objects. Suggestions don't cover every possible scope, but they are a quick and easy way to select a suitable scope for your tile.
Note: Suggestions won't be shown if an object has no children, parents or siblings.
Tip: If the exact scope you want isn't listed in the suggestions, you can select a suggested scope that is similar to the one you want, and then click on custom. The custom section will now automatically be filled with the suggestion you picked and you can edit the scope here to adjust it exactly to your needs. This is a more intuitive way to pick a scope than starting in the custom section and navigating the SCOM object model for classes and groups.
Double-check the scope when using suggestions: Using suggestions is an easy way to pick a scope, but you need to make sure that the generated suggestion is appropriate for all objects that use the perspective.
For example, when you pick a suggestion for an EA, you will get suggestions that are specific to the map, dependencies, and availability tests for this one EA. On perspectives you want to use for all EAs, you have to change the scope suggestion in the custom section so that the tile work for all EAs.
Enterprise Applications are designed so that you can map out the servers that make up the application. You can then configure tiles to show information related to just the servers on the EA's map. When you create a perspective that will be used for all EAs, you need to make sure that you scope the tiles so that they work for any EA. When you start with a suggestion, the tile's scope only works for the one EA you're currently looking at, and this is why you need to edit the scope:
For an EA you want to scope to the servers that are specified on the EA map by selecting something from the suggestions (Dashboard Server 4.2 and above) that shows something similar to the following:
This /<YourApplicationName> Map / ... / Windows ComputerThe above will scope the tile to all the objects of class Windows Computer on this EAs map.
The screenshot below shows some scope suggestions for an application called FinanceXS. The bold text shows the currently selected scope is This object. The cursor shows the option
This / FinanceXS / ... / Windows Computer. Once chosen this scope will show all the Windows computers shown on the applications map.Next, we need to adjust the specified scope to allow it to work for all EAs, rather than just this one.
- In the scope section click custom.
Click on the text
<YourApplicationName> Map (children)which is your first scope step. This will expand the scope step so you can edit it.Remove the auto-populated class
<YourApplicationName> Mapby clicking the cross x next to it.Start typing
Enterprise Application - Mapand select this from the list to add this class. This is so that this tile scope will work for all EAs, rather than just this one EA.- The scope is now configured to show all the Windows computers on the EA's map, whichever EA you happen to be viewing with the perspective.
You can pick between "this object" and objects that are related to this object as parents, children or siblings. The suggestions for children are written as paths that follow the SCOM object tree structure, parents and siblings can be identified by the word parent or sibling in the suggestion.
A parent of an object is any object that hosts or contains that object.
A child of an object is any object that this object hosts or contains.
A sibling of an object is any object of the same class that is hosted by the same parent.
| This object | The dynamic scope will be resolved to the object currently viewed. "this object" option which does NOT mean the actual one object like for the target setting but the relative object I'm looking at |
This / child / child / class of object | The dynamic scope will be resolved to children of the object currently viewed. You select objects of a particular class that are contained in path. The class of the objects you are selecting is stated at the end of the path. |
| This / * | The dynamic scope will be resolved to children of the object currently viewed. If a path ends with a wildcard (*) it means that you select all objects of any class within the path. Technically it means that we fill the class field with the class "logical entity" since every object in SCOM has this class, it is a "base" class Example: |
This / child / ... / class of object | The dynamic scope will be resolved to children of the object currently viewed. If a path contains an ellipsis (...) it means that you select objects of a particular class that are contained in all of the objects that are contained in the path preceding the ellipsis. The class of the objects you are selecting is stated at the end of the path. Example:
|
Parent class of object | The dynamic scope will be resolved to parents of the object currently viewed. |
Sibling class of object | The dynamic scope will be resolved to siblings of the object currently viewed. |
| Show more triangle next to a suggestion |
|
If you are looking at an EA, the path to find all windows computers in that EA may read Map / ... / Windows Computer. It returns all objects of the Windows Computer class contained within all of the paths under Map.
To narrow the scope down, you can click on the triangle to expand the suggestion and select one of the more specific paths. If you select Map / Web / Windows Computer you will find all objects of the Windows Computer class in the path Map / Web.
If you choose the option Map / * you'll find all objects contained in the map. If you extend this suggestion by clicking on the triangle, you'll see suggestions to select all objects in a more specific path, for example Map / Web / *.
Custom
Here you can pick objects that are related to the object you are currently looking at. If you want to create a specific scope that is not listed under suggestions, you can create the scope here.
Tip: You can pick a similar scope under suggestions first and then click on custom to edit it.
At the top, you'll see the name of the object you are currently looking at. Now you can choose if you want to pick parents or children of that object, and if this parent or child relation should be considered only one level up or down the SCOM model or through all levels.
Class:
Here you pick the class of the objects you want to select. If you leave this field empty, the scope falls back to the "this object" scope.
Note: You will only see groups and classes that the object you are currently looking at is a member of.
Tip: If you want to pick objects of any class, enter the SCOM base class logical entity in the class field.
Tip: If you want to find out what classes the object you are interested in belongs to, you can go to the Monitored Entity perspective of that object. You'll see all the classes the object belongs to listed there.
Criteria:
You can narrow the selection of objects of a particular class down further by entering criteria for those objects. For more help see How to use criteria when scoping objects.
Tip: If you want to find out what properties you can base your criteria on, you can go to the Monitored Entity perspective of the object you are interested in. You'll see all the properties for criteria listed there.
.
For example, for a perspective created for the group IIS8 Computer Group adding a Status tile scoped to show children with a class of object will show the group members, i.e. the members of the IIS8 Computer Group.
If you need to traverse a more advanced SCOM object model like an EA, you can use the + button to add more steps. This creates a scope that can go through any kind of path of the SCOM object model.
Complete the following steps and then click the + button after you're done to add the next level of SCOM objects:
At the top, you'll see the name of the object you are currently looking at. Now you can choose if you want to pick parents or children of that object, and if this parent or child relation should be considered only one level up or down the SCOM model or through all levels.
Class:
Here you pick the class of the objects you want to select. If you leave this field empty, the scope falls back to the "this object" scope.
Note: You will only see groups and classes that the object you are currently looking at is a member of.
Tip: If you want to pick objects of any class, enter the SCOM base class logical entity in the class field.
Tip: If you want to find out what classes the object you are interested in belongs to, you can go to the Monitored Entity perspective of that object. You'll see all the classes the object belongs to listed there.
Criteria:
You can narrow the selection of objects of a particular class down further by entering criteria for those objects. For more help see How to use criteria when scoping objects.
Tip: If you want to find out what properties you can base your criteria on, you can go to the Monitored Entity perspective of the object you are interested in. You'll see all the properties for criteria listed there.
.
Other specific objects
Gives you the normal, non-dynamic scope options you are used to when scoping tiles on dashboards. This means the tile will not dynamically adapt it's content to the currently viewed
Since the power of perspectives is that their tiles can show data for different
The Alerts and the SCOM task tile have slightly different options than other tiles because they require different settings.
This object
The dynamic scope will be the resolved to the object that is currently viewed.
Relative objects
The dynamic scope will be resolved to relative objects (parents or children) of the object that is currently viewed.
At the top, you'll see the name of the object you are currently looking at. Now you can choose if you want to pick parents or children of that object, and if this parent or child relation should be considered only one level up or down the SCOM model or through all levels.
Class:
Here you pick the class of the objects you want to select. If you leave this field empty, the scope falls back to the "this object" scope.
Note: You will only see groups and classes that the object you are currently looking at is a member of.
Tip: If you want to pick objects of any class, enter the SCOM base class logical entity in the class field.
Tip: If you want to find out what classes the object you are interested in belongs to, you can go to the Monitored Entity perspective of that object. You'll see all the classes the object belongs to listed there.
Criteria:
You can narrow the selection of objects of a particular class down further by entering criteria for those objects. For more help see How to use criteria when scoping objects.
Tip: If you want to find out what properties you can base your criteria on, you can go to the Monitored Entity perspective of the object you are interested in. You'll see all the properties for criteria listed there.
.
Note for SCOM task tiles:
You have to pick one single object for SCOM task tiles since the task has to be run for one specific object. If you pick the scope option relative objects, you need to narrow the scope down to one object with the help of a class and criteria.
Other specific objects
Gives you the normal, non-dynamic scope options you are used to when scoping tiles on dashboards. This means the tile will not dynamically adapt it's content to the currently viewed
Since the power of perspectives is that their tiles can show data for different
How to change the order of perspectives
You can change the order of perspectives for an object simply by dragging them to a new position on the perspective ribbon. The first perspective on the far left of the ribbon bar is the default perspective that will be shown first when you navigate to the object.
- Navigate to the perspective you want to move.
- Click on the edit button

Click on the perspective name on the ribbon and drag it to its new position.

How to put an object in maintenance mode on a perspective
Maintenance mode allows you to set a SCOM object to a suppressed state, allowing you to complete work on the object without additional alerts and errors being generated.
Objects that can be put into maintenance mode in SCOM (single objects, groups, DAs, EAs, etc.) have a convenient maintenance mode button on their drilldown in Dashboard Server SCOM Edition. You can put the object into maintenance mode just by clicking the button.

How to identify if an object is in maintenance mode
When an object is in maintenance mode, you'll see maintenance mode next to its name on the object's drilldown.

The health icon will have a wrench icon ![]() overlayed. The same icon will also be displayed in tiles that show a health status for objects, such as the Status tile.
overlayed. The same icon will also be displayed in tiles that show a health status for objects, such as the Status tile.
Does putting an object in maintenance mode affect its contained objects?
When you put an object into maintenance mode in Dashboard Server SCOM Edition, all contained sub-components (such as disks, software, or group members) are also placed into maintenance mode.
Note for Enterprise Applications (EAs): Putting an Enterprise Application (EA) into maintenance mode will also put the Dependencies into maintenance mode. Since you usually don't want all Dependencies in maintenance mode, the better way to do it is to put the individual components of the EA into maintenance mode. For example, if you want to put the components that make up your application and all the availability tests into maintenance mode, drilldown to the Map and Availability objects and put them into maintenance mode, but leave the Dependencies.
How to put a SCOM object into maintenance mode
View a distributed application or group in Dashboard Server SCOM Edition by searching for it or drilling down from another dashboard.
Go to the object you want to put in maintenance mode by searching for it or drilling down from another dashboard.
On the drilldown page, click the maintenance mode button.
The maintenance mode pane opens.
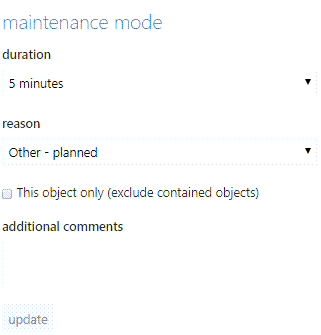
Enter the settings for the maintenance mode:
Duration Select how long the object will be in maintenance mode, in minutes, hours or days. Reason Choose a reason from the dropdown.
The difference between planned and unplanned categories is that planned maintenance can be excluded from affecting downtime on Service Level Objectives.
This object only (exclude contained objects) Activate this checkbox to put only this object in maintenance mode, not the other objects it contains.
What happens if you don't activate this checkbox?When you put an object into maintenance mode in Dashboard Server SCOM Edition, all contained sub-components (such as disks, software, or group members) are also placed into maintenance mode.
Note for Enterprise Applications (EAs): Putting an Enterprise Application (EA) into maintenance mode will also put the Dependencies into maintenance mode. Since you usually don't want all Dependencies in maintenance mode, the better way to do it is to put the individual components of the EA into maintenance mode. For example, if you want to put the components that make up your application and all the availability tests into maintenance mode, drilldown to the Map and Availability objects and put them into maintenance mode, but leave the Dependencies.
Additional comments Enter a comment for context and explanation, for instance if your server has failed due to low disk space you may want to give context when setting maintenance mode and correcting this issue. Click Update to put the object into maintenance mode.
When an object is in maintenance mode, you'll see maintenance mode next to its name on the object's drilldown.
The health icon will have a wrench icon
 overlayed. The same icon will also be displayed in tiles that show a health status for objects, such as the Status tile.
The object will stay in maintenance mode for the time span you defined in the settings.
Tip: You can end or extend the maintenance mode in the maintenance pane at any time. If you closed the maintenance pane, click on maintenance mode next to the object's name to open it again.
If you finish your maintenance activities early, you can disable maintenance mode by clicking on disable in the maintenance mode pane to immediately end maintenance mode.
If you need to extend the maintenance mode time, enter a new duration in the maintenance mode pane and click on update .
How to run tasks on perspectives
There are two different ways to run SCOM tasks in Dashboard Server:
Running tasks on dashboards or perspectives in the SCOM Task tile
Running tasks in the tile allows you to show the results of a SCOM task in a tile on a dashboard or perspective. Tasks in the SCOM Task run every time the dashboard refreshes (by default every minute).
Running tasks directly from a dashboard or perspective via a button
You can run tasks directly from a dashboard or perspective just by clicking a button. Tasks that are executed via a button only run when the button is clicked.
On perspectives, you can run any task that is available for that object with the task button at the top of the perspective.
How to run a task on a perspective with the task buttonGo to the object you want to run the task for and choose any of the available perspectives.
Click on the task button at the top of the perspective.

Now a dropdown menu with all available tasks opens.
Choose the task you want to run from the dropdown menu.
Which tasks are available depends on the object and the management packs that are installed. Only users with the correct SCOM access will be able to run the task (see How do SCOM roles affect what users can do in Dashboard Server?).
Some tasks let you override parameters, for example the time until the task runs into a timeout. Which parameters are available depends on the task.
If you want to override parameters for the task, click add under override parameters and enter your settings.
Click execute to run the task.
A new sections opens and displays the result of the task. The results are visible until you close the section or leave the page.
On dashboards and perspectives, you can create an action button for a specific task.
What is an action button?Action buttons are customized buttons that you can add at the top of a dashboard
or perspective . How to create an action button for a specific task
For dashboards: Go to the dashboard where you want to add the action button.For perspectives: If you want to add the action button to a specific perspective, go to
an object that contains the perspective and choose this perspective. If you want to add the action button to all perspectives of a specificclass of objects , go toan object that is a member of this class .Click on the edit button to go into edit mode.
Click on the Edit actions button.
Under Actions, click on the add button.
Enter a name for your new action button.
Select the type of action you want to create:
Open an internal link
An internal link within your Dashboard Server instance.
For example, when you want to link from an object's perspective to a dashboard that is relevant for that object. Internal links use only the part of the URL that comes after .../SquaredUpv[version number]/. For example, if the full URL to a dashboard is https://mysquaredup.com/SquaredUpv5/page/dashboard-enterprise-applications, you need to use /page/dashboard-enterprise-applications.Open a web link
A link to any URL. For example, when you have a dashboard for monitoring a website or application, you can add a link to that website or application. Web links have to include the http:// or https:// prefix. These links will open in a new tab by default.
Execute a SCOM task
You can run a SCOM task on an object.
Which tasks are available depends on the object and the management packs that are installed. Only users with the correct SCOM access will be able to run the task (see How do SCOM roles affect what users can do in Dashboard Server?).
If you selected the action type "task":
For dashboards: Enter the object you want to run the task on. While you are typing, you'll get suggestions for matching objects. Then select the task you want to run from the dropdown.
Which tasks are available depends on the object and the management packs that are installed. Only users with the correct SCOM access will be able to run the task (see How do SCOM roles affect what users can do in Dashboard Server?).
Some tasks let you override parameters, for example the time until the task runs into a timeout. Which parameters are available depends on the task.
For perspectives: Select the task you want to run for the object you are currently viewing.
Take care to add task buttons to a relevant perspective so the button doesn't appear for objects where it will not run. For example, if you add the Display Server Statistics task to a button on the Monitored Entity perspective then it will show for all objects, but when if you try to run it when you are viewing an application you will get a task failed error message because server statistics cannot be shown for an application.
Which tasks are available depends on the object and the management packs that are installed. Only users with the correct SCOM access will be able to run the task (see How do SCOM roles affect what users can do in Dashboard Server?).
Some tasks let you override parameters, for example the time until the task runs into a timeout. Which parameters are available depends on the task.
Only for perspectives: Decide when the action button will be shown.
"only show when this perspective is selected":
If you leave the checkbox activated, the action button will be visible only on this one perspective.If you deactivate the checkbox, the action button will be visible on all perspectives for all objects of the same class as the object you are currently viewing.
Click done to save the action button.
- You can add more buttons or click done to finish adding buttons.
Click publish to make the changes live.
You can now see your newly added action button.
For task action buttons: All users with the correct SCOM access will be able to run the task with the action button. Clicking the button will display the results of the task at the top of the page. The results stay there until you close them or go to another page.
5 minute Video
This 5 minute video 'Dashboard actions' describes how to create and edit actions on a dashboard or perspective:
Action buttons for perspectives
Action buttons are customized buttons that you can add at the top of a dashboard
You can choose between different types of actions:
Open an internal link
An internal link within your Dashboard Server instance.
For example, when you want to link from an object's perspective to a dashboard that is relevant for that object. Internal links use only the part of the URL that comes after .../SquaredUpv[version number]/. For example, if the full URL to a dashboard is https://mysquaredup.com/SquaredUpv5/page/dashboard-enterprise-applications, you need to use /page/dashboard-enterprise-applications.Open a web link
A link to any URL. For example, when you have a dashboard for monitoring a website or application, you can add a link to that website or application. Web links have to include the http:// or https:// prefix. These links will open in a new tab by default.
Execute a SCOM task
You can run a SCOM task on an object.
Which tasks are available depends on the object and the management packs that are installed. Only users with the correct SCOM access will be able to run the task (see How do SCOM roles affect what users can do in Dashboard Server?).
How to add an action button to a perspective
For dashboards: Go to the dashboard where you want to add the action button.For perspectives: If you want to add the action button to a specific perspective, go to
an object that contains the perspective and choose this perspective. If you want to add the action button to all perspectives of a specificclass of objects , go toan object that is a member of this class .Click on the edit button to go into edit mode.
Click on the Edit actions button.
Under Actions, click on the add button.
Enter a name for your new action button.
Select the type of action you want to create:
Open an internal link
An internal link within your Dashboard Server instance.
For example, when you want to link from an object's perspective to a dashboard that is relevant for that object. Internal links use only the part of the URL that comes after .../SquaredUpv[version number]/. For example, if the full URL to a dashboard is https://mysquaredup.com/SquaredUpv5/page/dashboard-enterprise-applications, you need to use /page/dashboard-enterprise-applications.Open a web link
A link to any URL. For example, when you have a dashboard for monitoring a website or application, you can add a link to that website or application. Web links have to include the http:// or https:// prefix. These links will open in a new tab by default.
Execute a SCOM task
You can run a SCOM task on an object.
Which tasks are available depends on the object and the management packs that are installed. Only users with the correct SCOM access will be able to run the task (see How do SCOM roles affect what users can do in Dashboard Server?).
If you selected the action type "task":
For dashboards: Enter the object you want to run the task on. While you are typing, you'll get suggestions for matching objects. Then select the task you want to run from the dropdown.
Which tasks are available depends on the object and the management packs that are installed. Only users with the correct SCOM access will be able to run the task (see How do SCOM roles affect what users can do in Dashboard Server?).
Some tasks let you override parameters, for example the time until the task runs into a timeout. Which parameters are available depends on the task.
For perspectives: Select the task you want to run for the object you are currently viewing.
Take care to add task buttons to a relevant perspective so the button doesn't appear for objects where it will not run. For example, if you add the Display Server Statistics task to a button on the Monitored Entity perspective then it will show for all objects, but when if you try to run it when you are viewing an application you will get a task failed error message because server statistics cannot be shown for an application.
Which tasks are available depends on the object and the management packs that are installed. Only users with the correct SCOM access will be able to run the task (see How do SCOM roles affect what users can do in Dashboard Server?).
Some tasks let you override parameters, for example the time until the task runs into a timeout. Which parameters are available depends on the task.
Only for perspectives: Decide when the action button will be shown.
"only show when this perspective is selected":
If you leave the checkbox activated, the action button will be visible only on this one perspective.If you deactivate the checkbox, the action button will be visible on all perspectives for all objects of the same class as the object you are currently viewing.
Click done to save the action button.
- You can add more buttons or click done to finish adding buttons.
Click publish to make the changes live.
You can now see your newly added action button.
For task action buttons: All users with the correct SCOM access will be able to run the task with the action button. Clicking the button will display the results of the task at the top of the page. The results stay there until you close them or go to another page.
5 minute Video
This 5 minute video 'Dashboard actions' describes how to create and edit actions on a dashboard or perspective:
FAQs and Troubleshooting
How can I add a perspective to the navigation bar?
See Pinned Perspectives.
I have duplicates of some perspectives on the perspective ribbon, what can I do?
This can happen if the same dashboard pack is imported more than once. The easiest way to resolve this is to delete the duplicate perspectives from Dashboard Server. This can't be undone, so make sure you have a backup of Dashboard Server (How to backup and restore Dashboard Server SCOM Edition).
Click on a duplicated perspective, click the edit button at the top right of the page, and then click the delete button.

Can I convert a dashboard to a perspective?
You can easily convert an existing dashboard into a perspective. This is useful when you have multiple objects you want to get the same kind of information about. Instead of creating separate dashboards for each object, you can use one perspective that will dynamically show the information depending on which object is currently viewed.
Note: Converting a dashboard does not delete the original dashboard. It preserves the original dashboard and creates a new perspective based on that dashboard.
Click the edit button.
Click the Convert To Perspective button.

Choose the target for the new perspective under Create perspective for.
The target of a perspectives determines two things:
for which set of
objects the perspective will be visible in the perspective ribbonwhich set of
objects will be used for the dynamic scope of the tilesNote about the relation between the perspective's target and the scope of the perspective's tiles:
Usually, when you create tiles on a perspective you use a dynamic scope for them that adapts to the currently viewedobject . When you define a perspective's target, you define for whichobjects the perspective will be available. Since the target determines theobjects that can be viewed and the currently viewedobject determines how the dynamic scope is resolved, the target directly affects the scope of those tiles.
specific object Creates a perspective for a single object with the target setting "this object only" group Creates a perspective for a group object with the target setting "this object only" members of Creates a perspective with the target setting "members of" the group or class you picked Example: If you want the new perspective to appear for all Distributed Applications (DAs) choose Create perspective formembers of and in the Class box type
serviceand then select System.Service from the drop down list: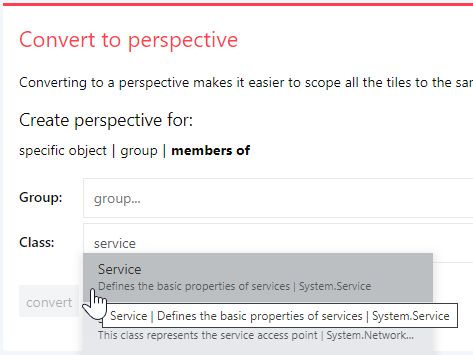
Click convert.
The dashboard will be converted to a perspective, and you will be navigated to the new perspective.
Note: Converting a dashboard does not delete the original dashboard. It preserves the original dashboard and creates a new perspective based on that dashboard.
After converting a dashboard to a perspective, the scope of each tile will be set to the non-dynamic scope option "other specific objects". To take advantage of the power of perspectives, you need to edit the tiles on the perspective to use a dynamic scope.
Example: If you want a Status tile to show the health status of each of the DA components change the scope to custom, select the children and one level options, and set the Class to
object.Scope options for tiles on perspectivesThe power of perspectives is that tiles on a perspective can use a dynamic scope. A dynamic scope considers the currently viewed
object . A dynamic scope consists of two different states:the configuration of the scope in the tile (for example, "consider child objects of type logical disk for the currently viewed object")
the actual resolved scope that depends on which
object you are currently viewing ("this object has 5 child objects of type logical disk")
After configuring the dynamic scope once in the tile, you'll get different results depending how the scope is resolved on the different
objects you are viewing.General advice for scoping tiles on perspectives
Remember that a scope for tiles on perspectives usually has to be fitting for multiple different objects. You always have to consider:
For which objects will this perspective be visible? (determined by the target of the perspective)
Is the scope I am configuring for a tile appropriate for all objects the perspective will be visible on?
Example:
You create a perspective with the target "class: Windows Server". The perspective will therefore be visible for all objects of the class Windows Server.Now you create a tile on the perspective and scope it to "this object's children of class: Windows Server 2016 Logical Disk". This means that when you view a 2016 Windows server, you'll see data about the server's logical disks in the tile. But when you view a 2012 Windows Server the tile will show no data because the tile's scope is limited to logical disks on 2016 servers. Instead of picking "Windows Server 2016 Logical Disk" you should pick "Windows Server Logical Disk" to make the tile adjust to any object that uses the perspective.
There are two different sets of options when scoping tiles on perspectives. It depends on the tile you want to scope which set of options you'll see.
Scope options for all tiles except Alert and SCOM task tilesSuggestions
Suggestions are generated based on the object you are currently viewing. You'll see a list of relevant scope options based on the object's relations to other objects. Suggestions don't cover every possible scope, but they are a quick and easy way to select a suitable scope for your tile.
Note: Suggestions won't be shown if an object has no children, parents or siblings.
Tip: If the exact scope you want isn't listed in the suggestions, you can select a suggested scope that is similar to the one you want, and then click on custom. The custom section will now automatically be filled with the suggestion you picked and you can edit the scope here to adjust it exactly to your needs. This is a more intuitive way to pick a scope than starting in the custom section and navigating the SCOM object model for classes and groups.
Double-check the scope when using suggestions: Using suggestions is an easy way to pick a scope, but you need to make sure that the generated suggestion is appropriate for all objects that use the perspective.
For example, when you pick a suggestion for an EA, you will get suggestions that are specific to the map, dependencies, and availability tests for this one EA. On perspectives you want to use for all EAs, you have to change the scope suggestion in the custom section so that the tile work for all EAs.Walkthrough: Editing a scope suggestion to make it work for all EAsEnterprise Applications are designed so that you can map out the servers that make up the application. You can then configure tiles to show information related to just the servers on the EA's map. When you create a perspective that will be used for all EAs, you need to make sure that you scope the tiles so that they work for any EA. When you start with a suggestion, the tile's scope only works for the one EA you're currently looking at, and this is why you need to edit the scope:
For an EA you want to scope to the servers that are specified on the EA map by selecting something from the suggestions (Dashboard Server 4.2 and above) that shows something similar to the following:
This /<YourApplicationName> Map / ... / Windows ComputerThe above will scope the tile to all the objects of class Windows Computer on this EAs map.
The screenshot below shows some scope suggestions for an application called FinanceXS. The bold text shows the currently selected scope is This object. The cursor shows the option
This / FinanceXS / ... / Windows Computer. Once chosen this scope will show all the Windows computers shown on the applications map.Next, we need to adjust the specified scope to allow it to work for all EAs, rather than just this one.
- In the scope section click custom.
Click on the text
<YourApplicationName> Map (children)which is your first scope step. This will expand the scope step so you can edit it.Remove the auto-populated class
<YourApplicationName> Mapby clicking the cross x next to it.Start typing
Enterprise Application - Mapand select this from the list to add this class. This is so that this tile scope will work for all EAs, rather than just this one EA.- The scope is now configured to show all the Windows computers on the EA's map, whichever EA you happen to be viewing with the perspective.
How to read the suggestionsYou can pick between "this object" and objects that are related to this object as parents, children or siblings. The suggestions for children are written as paths that follow the SCOM object tree structure, parents and siblings can be identified by the word parent or sibling in the suggestion.
A parent of an object is any object that hosts or contains that object.
A child of an object is any object that this object hosts or contains.
A sibling of an object is any object of the same class that is hosted by the same parent.This object The dynamic scope will be resolved to the object currently viewed.
"this object" option which does NOT mean the actual one object like for the target setting but the relative object I'm looking at
This / child/child/class of objectThe dynamic scope will be resolved to children of the object currently viewed.
You select objects of a particular class that are contained in path. The class of the objects you are selecting is stated at the end of the path.
This / * The dynamic scope will be resolved to children of the object currently viewed.
If a path ends with a wildcard (*) it means that you select all objects of any class within the path.
Technically it means that we fill the class field with the class "logical entity" since every object in SCOM has this class, it is a "base" class
Example:
This / IIS Web Server / *selects all objects of any class in the level belowThis / IIS Web Server.This / child/ ... /class of objectThe dynamic scope will be resolved to children of the object currently viewed.
If a path contains an ellipsis (...) it means that you select objects of a particular class that are contained in all of the objects that are contained in the path preceding the ellipsis. The class of the objects you are selecting is stated at the end of the path.
Example:
This / Sales App Map / ... / Windows Computerselects all objects of the class Windows Computer in theThis / Sales App Mappath.Parent class of objectThe dynamic scope will be resolved to parents of the object currently viewed. Sibling class of objectThe dynamic scope will be resolved to siblings of the object currently viewed. Show more triangle next to a suggestion
You can click the show more triangle to expand the list of suggestions and see more specific paths.Example for navigating suggestions in an EAIf you are looking at an EA, the path to find all windows computers in that EA may read
Map / ... / Windows Computer. It returns all objects of the Windows Computer class contained within all of the paths underMap.To narrow the scope down, you can click on the triangle to expand the suggestion and select one of the more specific paths. If you select
Map / Web / Windows Computeryou will find all objects of the Windows Computer class in the pathMap / Web.If you choose the option
Map / *you'll find all objects contained in the map. If you extend this suggestion by clicking on the triangle, you'll see suggestions to select all objects in a more specific path, for exampleMap / Web / *.Custom
Here you can pick objects that are related to the object you are currently looking at. If you want to create a specific scope that is not listed under suggestions, you can create the scope here.
Tip: You can pick a similar scope under suggestions first and then click on custom to edit it.
How to pick a simple relation (one step through the SCOM model)At the top, you'll see the name of the object you are currently looking at. Now you can choose if you want to pick parents or children of that object, and if this parent or child relation should be considered only one level up or down the SCOM model or through all levels.
Class:
Here you pick the class of the objects you want to select. If you leave this field empty, the scope falls back to the "this object" scope.
Note: You will only see groups and classes that the object you are currently looking at is a member of.
Tip: If you want to pick objects of any class, enter the SCOM base class logical entity in the class field.
Tip: If you want to find out what classes the object you are interested in belongs to, you can go to the Monitored Entity perspective of that object. You'll see all the classes the object belongs to listed there.
Criteria:
You can narrow the selection of objects of a particular class down further by entering criteria for those objects. For more help see How to use criteria when scoping objects.
Tip: If you want to find out what properties you can base your criteria on, you can go to the Monitored Entity perspective of the object you are interested in. You'll see all the properties for criteria listed there.
.
Example for picking a simple relationFor example, for a perspective created for the group IIS8 Computer Group adding a Status tile scoped to show children with a class of
objectwill show the group members, i.e. the members of the IIS8 Computer Group.How to pick advanced relations (multiple steps through the SCOM model)If you need to traverse a more advanced SCOM object model like an EA, you can use the + button to add more steps. This creates a scope that can go through any kind of path of the SCOM object model.
Complete the following steps and then click the + button after you're done to add the next level of SCOM objects:
At the top, you'll see the name of the object you are currently looking at. Now you can choose if you want to pick parents or children of that object, and if this parent or child relation should be considered only one level up or down the SCOM model or through all levels.
Class:
Here you pick the class of the objects you want to select. If you leave this field empty, the scope falls back to the "this object" scope.
Note: You will only see groups and classes that the object you are currently looking at is a member of.
Tip: If you want to pick objects of any class, enter the SCOM base class logical entity in the class field.
Tip: If you want to find out what classes the object you are interested in belongs to, you can go to the Monitored Entity perspective of that object. You'll see all the classes the object belongs to listed there.
Criteria:
You can narrow the selection of objects of a particular class down further by entering criteria for those objects. For more help see How to use criteria when scoping objects.
Tip: If you want to find out what properties you can base your criteria on, you can go to the Monitored Entity perspective of the object you are interested in. You'll see all the properties for criteria listed there.
.
Other specific objects
Gives you the normal, non-dynamic scope options you are used to when scoping tiles on dashboards. This means the tile will not dynamically adapt it's content to the currently viewed
object , it will always show data for the staticobject picked here.Since the power of perspectives is that their tiles can show data for different
objects depending on whatobject is currently being viewed, you should only select this option when you are sure that there is no relationship between the desired scope and the currently viewedobject .Scope options for Alerts and SCOM task tilesThe Alerts and the SCOM task tile have slightly different options than other tiles because they require different settings.
This object
The dynamic scope will be the resolved to the object that is currently viewed.
Relative objects
The dynamic scope will be resolved to relative objects (parents or children) of the object that is currently viewed.
How to pick relative objectsAt the top, you'll see the name of the object you are currently looking at. Now you can choose if you want to pick parents or children of that object, and if this parent or child relation should be considered only one level up or down the SCOM model or through all levels.
Class:
Here you pick the class of the objects you want to select. If you leave this field empty, the scope falls back to the "this object" scope.
Note: You will only see groups and classes that the object you are currently looking at is a member of.
Tip: If you want to pick objects of any class, enter the SCOM base class logical entity in the class field.
Tip: If you want to find out what classes the object you are interested in belongs to, you can go to the Monitored Entity perspective of that object. You'll see all the classes the object belongs to listed there.
Criteria:
You can narrow the selection of objects of a particular class down further by entering criteria for those objects. For more help see How to use criteria when scoping objects.
Tip: If you want to find out what properties you can base your criteria on, you can go to the Monitored Entity perspective of the object you are interested in. You'll see all the properties for criteria listed there.
.
Note for SCOM task tiles:
You have to pick one single object for SCOM task tiles since the task has to be run for one specific object. If you pick the scope option relative objects, you need to narrow the scope down to one object with the help of a class and criteria.
Other specific objects
Gives you the normal, non-dynamic scope options you are used to when scoping tiles on dashboards. This means the tile will not dynamically adapt it's content to the currently viewed
object , it will always show data for the staticobject picked here.Since the power of perspectives is that their tiles can show data for different
objects depending on whatobject is currently being viewed, you should only select this option when you are sure that there is no relationship between the desired scope and the currently viewedobject .